


There’s an unsolicited guest in your home, lurking in the shadows, sneaking around at night, and nibbling on your pantry items: rodents. Whether it’s the audacious rats or the shy mice, rodent removal isn’t just a choice; it’s a necessity.
Not only are they carriers of diseases, but they can also cause damage to your precious abode. From your attic’s insulation to the quiet corners of your shed, these critters can be found almost anywhere. As a homeowner or property manager, understanding how to evict these unwelcome tenants is critical.
Dive in as we unravel the mystery behind their habits, and guide you through the intricacies of removing them from every nook and cranny of your property.
Understanding Rodents
Habits of Rodents
Rodents are nocturnal creatures. They love secluded, dark places and are known for their ability to adapt to various environments. They breed rapidly, and their population can get out of control if not addressed promptly.
Why Rodents Enter Homes
Food, shelter, and safety are the primary attractions. Leftover food items and easily accessible pantry goods are magnets for these pests. Gaps in the walls, unsealed windows, or unscreened vents offer them an open invitation.
Removing Rodents from Different Locations
Rodents can be sneaky and adapt to various environments. From the echoing spaces of chimneys to the insulated ceilings, these critters can inhabit different locations. Here’s a breakdown of how to tackle them in each setting:
How to Remove Rodents from Chimneys
Estimated Cost:
Cost can vary significantly based on whether you decide to tackle the problem yourself or call in the professionals. Need an exact figure? Contact us for a detailed quote.
Prep Time: 1 hour
Gather all essential supplies and tools. Lay a drop cloth in front of the fireplace to catch any debris or escaping rodents, and remove any nearby items that could get damaged.
Perform Time: 3 hours
Setting up the trap and removing the rodents will take time, patience, and persistence.
Total Time: 4 hours
From preparation to executing the removal process, ensure you’ve set aside enough time to deal with the rodents comprehensively.
Essential Supplies:
- Rodent Traps: Effective in catching rodents without causing harm.
- Bait: Usually a combination of peanut butter, cheese, or fruits.
Tools required
- Protective gloves: Protects against bites or scratches.
- Flashlight: Helpful to see in dark areas of the chimney.
Challenges faced when removing Rodents from chimneys
- Vertical Complexity: Chimneys are tall structures, and rodents can nest at various heights, making it difficult to locate and remove them.
- Limited Access: The narrow and elongated structure of most chimneys means there’s restricted space to work in, which can make setting traps or retrieving rodents a tricky task.
- Safety Concerns: Climbing up to inspect or deal with rodent issues presents a risk of falls or injuries. There’s also a risk of inhaling soot and ash, which can be harmful.
- Multiple Entry/Exit Points: Rodents are adept climbers and can use both the inside and outside of the chimney for movement, making it challenging to corner or trap them effectively.
- Soot and Debris: The residue inside chimneys can obscure nests or rodent trails, making it harder to identify their exact location.
Step-by-step guide to removing Rodents from chimneys
- Safety First:
- Before beginning, wear protective gear such as a mask to avoid inhaling soot and ash, and ensure you have a stable ladder or platform if you need to climb.
- Inspect the Chimney’s Vertical Length:
- Use a flashlight to carefully inspect from top to bottom, understanding the entire vertical complexity of the chimney.
- Look for signs like droppings, gnawed surfaces, or nests to locate the rodents’ primary residence.
- Access Planning:
- Given the chimney’s limited access, strategize on the best methods to reach the rodents. This might involve tools with extended handles or flexible camera devices to see deep into the structure.
- Seal External Exit/Entry Points:
- Before setting up traps, ensure that all potential external entry or exit points are temporarily sealed. This will prevent rodents from escaping out or additional rodents from entering during the removal process.
- Clearing Soot and Debris:
- Lightly clean areas where you suspect rodent activity. This helps in making traps more effective and provides a clearer view of where the rodents are frequenting.
- Set the Trap:
- Place baited traps strategically, focusing on areas identified during the inspection.
- Given the chimney’s narrow nature, consider using slim or vertically oriented traps.
- Monitor and Remove:
- Regularly check the traps, and once a rodent is captured, remove it promptly to prevent distress signals that might deter other rodents.
- Post-Removal Cleanup:
- After ensuring all rodents have been removed, clean up the chimney to remove any traces of rodent presence. This includes droppings, food scraps, or nesting materials.
- Permanent Sealing and Repairs:
- Thoroughly inspect the chimney for any damages the rodents might have caused, especially to the flue lining.
- Repair any damages and permanently seal potential entry and exit points to prevent future infestations.
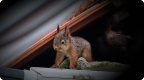
How to Get Rid of Rodents from Attics
Estimated Cost:
The cost of removing rats from attics can vary based on whether you choose to do it yourself or hire a professional. It is important to weigh the cost and benefits of each option carefully. Contact us for detailed information or a quote that will be tailored to your specific situation.
Prep Time: Estimated 1-2 hours
This includes the time taken to gather all the essential supplies and tools, and preparing the work area by removing items that may get damaged or soiled.
Perform Time: Estimated 2-4 hours
This is the estimated time it will take to set the trap, remove the rats, and clean the area.
Total Time: Estimated 3-6 hours
This is the total estimated time from preparing the work area to completing the rat removal process.
Essential Supplies:
- Rat Traps: Various types of traps are available, including snap traps, glue traps, and live traps. Choose the one that best fits your situation.
- Gloves: Essential for protecting yourself from diseases that rats may carry.
- Garbage Bags: For cleaning up and disposing of rat droppings and debris.
- Disinfectant: To clean and sanitize the area after the rats have been removed.
Tools required:
- Ladder: To reach the attic and set the trap.
- Flashlight: To inspect the attic and locate the rats.
- Broom and Dustpan: To clean the attic after the rats have been removed.
Challenges faced when removing Rodents from attics
- Hidden Nooks and Crannies: Attics often have hidden spaces, insulation, and stored items that provide rodents with numerous hiding spots.
- Insulation Concerns: Rodents can nest within or burrow through insulation, which can make them challenging to locate and can lead to insulation damage.
- High Up & Limited Space: Given that attics are typically at the top of homes, there’s the challenge of working in an elevated space which can be cramped and difficult to maneuver in.
- Potential for Large Infestations: Due to the sheltered and undisturbed nature of most attics, they can sometimes host significant rodent populations.
- Access Points: Attics typically have multiple access points like vents, broken roof tiles, or gaps which can allow rodents to enter and exit freely.
Step-by-step guide to removing Rodents from attics
- Safety First:
- Wear protective gear, such as gloves and a mask, to prevent contact with droppings or contaminated insulation.
- Use stable ladders or platforms to safely access the attic.
- Conduct a Thorough Inspection:
- Shine a flashlight across all areas of the attic, paying special attention to corners and hidden spaces.
- Look for signs of rodent activity: droppings, gnawed materials, or tracks in insulation.
- Clear Clutter:
- Remove or reorganize stored items in the attic to reduce hiding spots for rodents. This will also give you better access to all areas.
- Check and Protect Insulation:
- Inspect insulation for burrows or nests. Consider replacing heavily damaged sections.
- Set traps near insulation where you’ve observed signs of rodent activity.
- Seal Entry and Exit Points:
- Before setting up traps, identify and seal potential entry and exit points. This includes checking vents, gaps in roofing, or holes in the attic walls.
- Set the Trap:
- Place baited traps throughout the attic, especially near identified hotspots.
- Monitor and Remove:
- Check traps daily, and remove captured rodents promptly.
- Post-Removal Cleanup:
- Clean the attic of droppings, food scraps, and any nesting materials.
- Reinforce Attic Against Future Infestations:
- Once all rodents are removed, ensure all entry and exit points are sealed permanently.
- Consider adding rodent deterrents or repellents as an extra measure.
Removing Rodents from Walls
Estimated Cost:
The cost of removing rats from walls can vary based on whether you choose to do it yourself or hire a professional. It is important to weigh the cost and benefits of each option carefully. Contact us for detailed information or a quote that will be tailored to your specific situation.
Prep Time: Estimated 1-2 hours
This includes the time taken to gather all the essential supplies and tools, and preparing the work area by laying out a drop cloth and removing items that may get damaged or soiled.
Perform Time: Estimated 2-4 hours
This is the estimated time it will take to set the trap, remove the rats, and repair the wall.
Total Time: Estimated 3-6 hours
This is the total estimated time from preparing the work area to completing the rat removal process.
Essential Supplies:
- Rat Traps: Various types of traps are available, including snap traps, glue traps, and live traps. Choose the one that best fits your situation.
- Gloves: Essential for protecting yourself from diseases that rats may carry.
- Garbage Bags: For cleaning up and disposing of rat droppings and debris.
- Disinfectant: To clean and sanitize the area after the rats have been removed.
- Drywall Repair Supplies: Including joint compound, drywall tape, and sandpaper.
Tools required:
- Stud Finder: To locate the studs in the wall and determine the best location to cut an access hole.
- Drywall Saw: To cut an access hole in the wall.
- Screwdriver: To remove and replace electrical outlets or wall plates if necessary.
- Flashlight: To inspect the inside of the wall and locate the rats.
Challenges faced when removing Rodents from walls
- Limited Visibility and Access: The confined space within walls makes it hard to see and physically reach rodents, requiring specialized tools or techniques.
- Risk of Unintended Damage: Trying to access or trap rodents might result in unintentional damage to the wall, including the potential for hitting electrical or plumbing systems.
- Navigating Insulation: Many walls have insulation which can obscure the rodents and provide them with nesting material, further complicating removal.
- Determining Entry and Exit Points: Rodents can squeeze through incredibly small gaps, making it challenging to identify and seal all potential entry points in walls.
- Odor Concerns: If a rodent dies within a wall and is not promptly removed, it can lead to unpleasant odors which are challenging to eliminate.
Step-by-step guide to removing Rodents from walls
- Identify the Problem Area:
- Listen for the distinctive scratching or scurrying sounds to pinpoint the rodent’s location within the wall.
- Check for external signs of entry like holes or cracks.
- Plan Your Approach:
- Decide whether to access the rodents from an existing hole or if you need to make a controlled opening in the wall.
- Safety First:
- Turn off electricity to the area if you plan on making an opening, as there’s a risk of cutting through wires.
- Wear protective gear, like gloves and a mask, to avoid direct contact with rodents or their droppings.
- Access the Rodents:
- If there’s an existing hole, you might be able to place a trap near it.
- If not, consider making a small, controlled opening in the wall to access the area where you suspect the rodents are.
- Set the Trap:
- Insert a baited trap within or near the wall opening. Ensure the trap is the appropriate size for the type of rodent you’re dealing with.
- Monitor and Remove:
- Check the trap frequently. Once the rodent is captured, carefully remove it and dispose of it according to local guidelines.
- Repair and Cleanup:
- Clean the area inside the wall to remove any droppings, nesting materials, or food scraps.
- Repair the opening in the wall, ensuring it’s sealed tightly to prevent future infestations.
- Prevention:
- Examine the exterior and interior of your home for any small openings or cracks that rodents could use as entry points.
- Seal these points and consider adding rodent deterrents or repellents as an extra preventive measure.
How to remove rodents in Crawl Spaces
Estimated Cost:
The cost for rat removal from crawl spaces can vary depending on the severity of the infestation and whether you choose to do it yourself or hire a professional. Remember, it is important to consider not just the cost but also the effectiveness and safety of the method used. Contact us for a tailored quote and detailed information on your situation.
Prep Time: Estimated 2-4 hours
This includes the time taken to gather all the essential supplies and tools, and preparing the work area by laying out a drop cloth and removing items that may get damaged or soiled.
Perform Time: Estimated 4-8 hours
This is the estimated time it will take to set the trap, remove the rats, and sanitize the area.
Total Time: Estimated 6-12 hours
This is the total estimated time from preparing the work area to completing the rat removal process.
Essential Supplies:
- Rat Traps: There are several types available such as snap traps, glue traps, and live traps.
- Protective Clothing: Including gloves, goggles, and a mask to protect yourself from rat droppings and urine.
- Garbage Bags: For cleaning up and disposing of rat droppings, debris, and contaminated insulation.
- Disinfectant: To clean and sanitize the area after the rats have been removed.
Tools required:
- Flashlight: To inspect the crawl space and locate the rats.
- Long Stick or Pole: To place and remove traps in hard-to-reach areas.
Challenges faced when removing Rodents from crawl spaces
- Restricted Movement: Crawl spaces, by definition, offer limited space to move around, making it difficult to access all areas where rodents might be present.
- Damp and Dark Environment: The dampness and lack of light in many crawl spaces can make it uncomfortable to work in and can be attractive to rodents seeking shelter.
- Difficult to Monitor: Due to their out-of-the-way nature, infestations in crawl spaces might go unnoticed for a longer time, leading to larger rodent populations.
- Presence of Pests: Apart from rodents, crawl spaces might also be inhabited by other pests like insects, spiders, or even snakes, complicating the removal process.
- Ground Cover: Crawl spaces with dirt or gravel floors can make it hard to spot burrows or nests and can make setting up traps more challenging.
Step-by-step guide to removing Rodents from crawl spaces
- Safety First:
- Wear protective gear such as gloves, a mask, and perhaps even a jumpsuit. Consider using a headlamp for better visibility.
- Preliminary Inspection:
- Use a flashlight or headlamp to conduct a thorough visual check. Look for signs like droppings, burrows, or chewed materials to gauge the extent of the infestation.
- Clearing the Space:
- If there are storage items in the crawl space, consider removing or rearranging them temporarily to reduce hiding spots and improve accessibility.
- Set Up Traps:
- Place baited traps throughout the crawl space. If the floor is dirt or gravel, use a flat board or tile under the trap to stabilize it.
- Seal Entry Points:
- While traps are set inside, inspect the exterior for potential entry points like vents, gaps, or cracks. Ensure these are sealed to prevent further infestation.
- Regular Monitoring:
- Check the traps frequently and remove captured rodents. Given the hidden nature of crawl spaces, frequent checks are vital to ensure effective removal.
- Post-Removal Cleanup:
- After ensuring all rodents are removed, clean the crawl space. Consider laying a vapor barrier if there’s a dirt floor to reduce dampness and make future inspections easier.
- Ongoing Prevention:
- Regularly inspect the crawl space for signs of re-infestation. Consider using rodent repellents or deterrents as an extra measure.
How to remove Rodents in Ceilings
Estimated Cost:
The cost for rat removal from ceilings can vary based on the severity of the infestation and whether you choose to do it yourself or hire a professional. Please contact us for a detailed quote and information tailored to your situation.
Prep Time: Estimated 2-3 hours
This includes the time taken to gather all the essential supplies and tools, and preparing the work area by laying out a drop cloth and removing items that may get damaged or soiled.
Perform Time: Estimated 3-6 hours
This is the estimated time it will take to set the trap, remove the rats, and sanitize the area.
Total Time: Estimated 5-9 hours
This is the total estimated time from preparing the work area to completing the rat removal process.
Essential Supplies:
- Rat Traps: Various types like snap traps, glue traps, and live traps are available.
- Protective Clothing: Gloves, goggles, and a mask to protect yourself from rat droppings and urine.
- Garbage Bags: For cleaning up and disposing of rat droppings, debris, and contaminated insulation.
- Disinfectant: To clean and sanitize the area after the rats have been removed.
Tools required:
- Ladder: To reach the ceiling area.
- Flashlight: To inspect the ceiling area and locate the rats.
- Screwdriver: To remove ceiling panels if necessary.
Challenges faced when removing Rodents from ceilings
- High and Inaccessible Areas: Ceilings, especially those in large rooms or with vaulted designs, can be difficult to access without the right tools.
- Hidden Spaces: Rodents often nest between the joists or in spaces above suspended ceilings, making them hard to spot.
- Risk of Damage: The weight of a person or equipment can damage ceilings, especially if they are made of materials like drywall.
- Noise Amplification: Sounds made by rodents in ceilings can be amplified throughout a room, making it harder to pinpoint their exact location.
- Electrical Wires: Ceilings often contain electrical wiring for light fixtures, fans, etc. There’s a risk of electrocution or causing electrical damage during the removal process.
Step-by-step guide to removing Rodents from ceilings
- Safety Measures:
- Always turn off electricity to the area you’re working on, especially if you suspect rodents might have chewed through wires.
- Use a sturdy ladder or scaffolding to reach the ceiling safely.
- Pinpoint the Source:
- Listen carefully to locate the sounds of scurrying or gnawing. This will give you a general idea of where the rodents are nesting.
- Limited Intrusion:
- If you need to access the space above the ceiling, try to do so through existing fixtures (like vents or recessed lights) to minimize damage. If that’s not possible, you might need to make a controlled cut.
- Deploy Traps:
- Once you’ve accessed the space, place baited traps near the suspected nesting areas. If you’re dealing with a suspended ceiling, you can lift tiles individually to place traps.
- Regular Monitoring:
- Check the traps regularly. Due to the challenges of accessing ceilings, it’s essential to be efficient in your checks to reduce the number of times you need to go up.
- Repair and Prevention:
- After removal, patch up any holes or cuts made in the ceiling.
- Survey the exterior of the house to identify potential entry points for rodents and seal them.
- Electrical Check:
- Given the potential for rodents to chew on wires in the ceiling, it’s wise to have an electrician inspect the area to ensure there’s no damage or fire hazard.
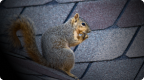
Removing Rodents from Roof
Estimated Cost:
The cost for rat removal from roofs can vary depending on several factors, including the size of the infestation and whether you opt for DIY or hire professionals. For a detailed quote and information tailored to your situation, please contact us.
Prep Time: Estimated 1-2 hours
This includes the time taken to gather all the essential supplies and tools, and preparing the work area by laying out a drop cloth and removing items that may get damaged or soiled.
Perform Time: Estimated 2-4 hours
This is the estimated time it will take to set the traps, remove the rats, and seal any entry points.
Total Time: Estimated 3-6 hours
This is the total estimated time from preparing the work area to completing the rat removal process.
Essential Supplies:
- Rat Traps: Snap traps, glue traps, and live traps are among the options.
- Protective Clothing: Gloves, goggles, and a mask to protect yourself from droppings and urine.
- Garbage Bags: For cleaning up and disposing of rat droppings, debris, and contaminated materials.
Tools required:
- Ladder: To reach the roof.
- Flashlight: For inspecting the roof area and locating the rats.
- Caulking Gun: To seal any cracks or openings in the roof.
Challenges faced when removing Rodents from roofs
- Height and Safety Concerns: Working on a roof presents the risk of falls and injuries. It requires secure footing and, at times, specialized equipment.
- Varying Roof Designs: Different roof types (e.g., flat, pitched, or mansard) can offer unique challenges in terms of accessibility and potential hiding spots for rodents.
- Weather Elements: Roofs are exposed to the elements, making it difficult to work in adverse weather conditions like rain or high winds.
- Diverse Entry Points: Rodents can enter through roof vents, under tiles, through damaged soffits, or other small openings.
- Nesting Material Accumulation: Rodents might accumulate nesting materials, which can clog gutters or downspouts, leading to potential water damage.
Step-by-step guide to removing Rodents from roofs
- Prioritize Safety:
- Use a sturdy ladder with rubberized feet for grip.
- Consider using safety ropes or harnesses, especially on steeply pitched roofs.
- Inspect for Entry Points:
- Check common entry spots like vents, eaves, soffits, and gaps under tiles or shingles. Also, look for signs of wear or gnawing, which can indicate the presence of rodents.
- Setting up Traps:
- Once you’ve identified potential nesting or traffic areas, set up baited traps. Ensure they are securely positioned so they don’t slide or fall off the roof.
- Regular Monitoring:
- Inspect the traps daily, if possible. Given the challenges of roof accessibility, efficient checks are essential.
- Sealing Off Access:
- After confirming the removal of the rodents, begin sealing any entry points. Use durable materials like metal mesh or steel wool, as rodents can chew through softer materials.
- Routine Maintenance:
- Regularly inspect your roof for damage, paying special attention to areas previously identified as entry points. Keep gutters clean to reduce potential nesting spots.
- Seek Professional Advice:
- If you’re unsure about the safety of accessing your roof or if you suspect a significant infestation, it might be best to hire professionals.
Removing Rodents from Garages or Sheds
Estimated Cost:
The cost for removing rats from garages or sheds will vary based on the size of the infestation and whether you choose to do it yourself or hire professionals. For a detailed quote and information tailored to your situation, please contact us.
Prep Time: Estimated 1-2 hours
This includes the time taken to gather all the essential supplies and tools, and preparing the work area by laying out a drop cloth and removing items that may get damaged or soiled.
Perform Time: Estimated 2-4 hours
This is the estimated time it will take to set the traps, remove the rats, and seal any entry points.
Total Time: Estimated 3-6 hours
This is the total estimated time from preparing the work area to completing the rat removal process.
Essential Supplies:
- Rat Traps: Snap traps, glue traps, and live traps are among the options.
- Protective Clothing: Gloves, goggles, and a mask to protect yourself from droppings and urine.
- Garbage Bags: For cleaning up and disposing of rat droppings, debris, and contaminated materials.
Tools required:
- Flashlight: For inspecting the area and locating the rats.
- Caulking Gun: To seal any cracks or openings in the garage or shed.
Challenges faced when removing Rodents from Garages or Sheds
- Clutter and Storage: Garages and sheds often become storage spaces for various items, providing numerous hiding spots for rodents.
- Unsealed Openings: These structures might have gaps, cracks, or holes due to less stringent construction compared to homes. These offer easy entry and exit points for rodents.
- Infrequent Human Activity: As garages or sheds might not be accessed daily, rodents can establish themselves without immediate detection.
- Availability of Food: Stored seeds, pet food, or garden products can be attractive food sources for rodents.
- Environmental Conditions: Garages and sheds can provide shelter from weather conditions, making them ideal nesting spots.
Step-by-step guide to removing Rodents from Garages or Sheds
- Initial Cleanup:
- Start by decluttering. Remove items from the floor and shelves, making it harder for rodents to hide.
- Thorough Inspection:
- Examine the space for signs of rodents – droppings, nests, gnawed items, or tracks. Pay attention to walls and floor corners where rodents may hide.
- Set the Traps:
- Place baited traps in areas you suspect rodent activity. If you’ve identified specific pathways or entry points, position traps accordingly.
- Monitor and Adjust:
- Check traps daily. If certain traps aren’t producing results after a couple of days, consider relocating them.
- Seal Access Points:
- Once the rodents are removed, it’s crucial to prevent a recurrence. Patch any holes, gaps, or cracks, and consider adding weather stripping to doors.
- Store Items Properly:
- Use sealed containers, especially for food-related items. Elevate items off the ground where possible.
- Routine Checks:
- Periodically inspect your garage or shed for signs of rodent activity, ensuring that your preventative measures remain effective.
- Consider Natural Deterrents:
- Some homeowners use natural repellents, like peppermint oil, to deter rodents. While not always a foolproof method, it can serve as an added layer of deterrence.
How to remove Rodents from Decks or Porches
Estimated Cost:
The cost for removing rats from decks or porches will vary based on whether you choose to do it yourself or hire professionals. For detailed information or a quote, contact us.
Prep Time: Estimated 1-2 hours
This includes gathering all the essential supplies and tools, and preparing the work area by laying out a drop cloth and removing items that may get damaged or soiled.
Perform Time: Estimated 2-4 hours
This is the estimated time it will take to set the traps, remove the rats, and seal any entry points.
Total Time: Estimated 3-6 hours
This is the total estimated time from preparing the work area to completing the rat removal process.
Essential Supplies:
- Rat Traps: Various types of traps like snap traps, glue traps, and live traps.
- Protective Clothing: Gloves, goggles, and a mask to protect yourself from droppings and urine.
- Garbage Bags: For cleaning up and disposing of rat droppings, debris, and contaminated materials.
Tools required:
- Flashlight: To inspect the area and locate the rats.
- Wire Mesh: To cover any openings or holes that rats may use to access the area.
- Screwdriver: To fix the wire mesh in place.
Challenges faced when removing Rodents from Decks or Porches
- Under-Deck Accessibility: The space beneath a deck or porch is often dark and secluded, offering an ideal hiding spot for rodents.
- Nested Among Support Beams: Rodents may nest or travel along the structural beams or joists, making them harder to reach and remove.
- Close to Ground and Gardens: Proximity to soil, gardens, or compost heaps can be a magnet for rodents seeking food and shelter.
- Debris Accumulation: Fallen leaves, twigs, or stored items can provide nesting materials for rodents, facilitating their stay.
- Entry Points to the Home: If the deck or porch is attached to the home, it can serve as a stepping stone for rodents to find entryways into your house.
Step-by-step guide to removing Rodents from Decks or Porches
- Clear and Clean:
- Remove any stored items from under the deck or porch. Sweep away or vacuum leaves, twigs, and other debris. A clean space offers fewer hiding places for rodents.
- Inspection:
- Look for signs of rodent activity such as droppings, gnaw marks, or tracks. Identify potential entry and exit points.
- Set Traps:
- Position baited traps in areas showing rodent activity. Given the structural beams and supports, ensure traps are securely placed and won’t fall or shift.
- Regular Monitoring:
- Check traps daily, and replace bait if needed. Relocate unproductive traps to more active spots.
- Seal Access Points:
- Once you’re confident in having removed the rodents, prevent their return. Block any gaps or holes using durable materials like metal mesh or steel wool.
- Elevate Stored Items:
- If you must store items under your deck or porch, elevate them off the ground. Using sealed containers can also deter rodents.
- Routine Inspections:
- Periodically check for signs of rodent activity, especially during seasons when rodents might be seeking shelter.
- Natural Deterrents:
- Planting mint or using natural repellents around the perimeter can sometimes deter rodents. While not entirely effective on their own, they can complement other preventative measures.
Conclusion
The presence of rodents in our living spaces isn’t just a nuisance; it’s a potential health hazard, a source of property damage, and undoubtedly an unwelcome disturbance. Whether they’ve taken up residence in the hidden corners of your attic or found solace beneath the shelter of your porch, understanding the specific challenges each location presents is the key to effective removal. This guide has walked you through those challenges and offered solutions tailored to each space.
But remember, removing rodents is just one part of the equation. Ensuring they don’t return is equally crucial. By regularly inspecting these areas, maintaining cleanliness, and being proactive with preventative measures, you’re not only ridding your home of these pests but also securing the health and safety of your living environment. Stay vigilant, stay informed, and here’s to maintaining a rodent-free home!